
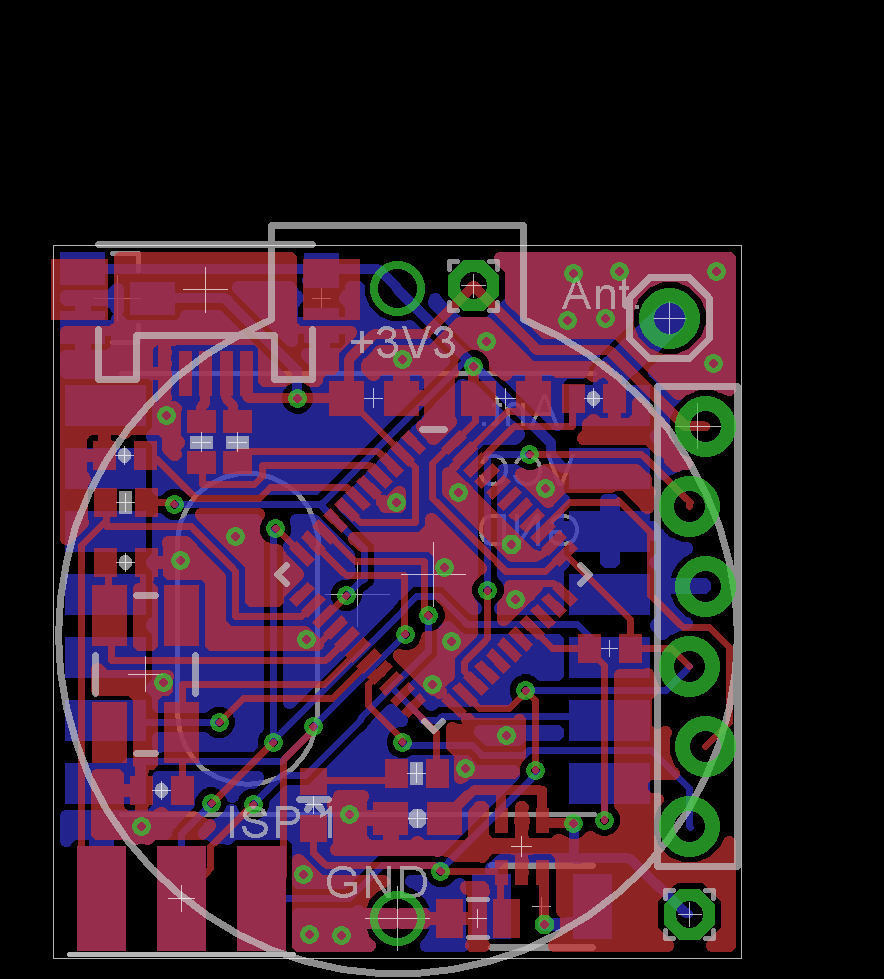
I haven’t had the time to follow up on the Atmega32u4 based new Funky, I now have finalized the board layout (I think). This has been quite a learning experience for me, I only started work on a remote node with this project few months ago and now this is pushing my hobby level skills to the edge. I publish the Eagle design file and board layout on github and would like to ask for peer review – comments are welcome. I will probably order few test PCBs in mid-January, but am terrified by the idea that I have to build them by hand: these are 0402 sized components and QFN version of the Atmega32u4. I will be asking a friend to help me out.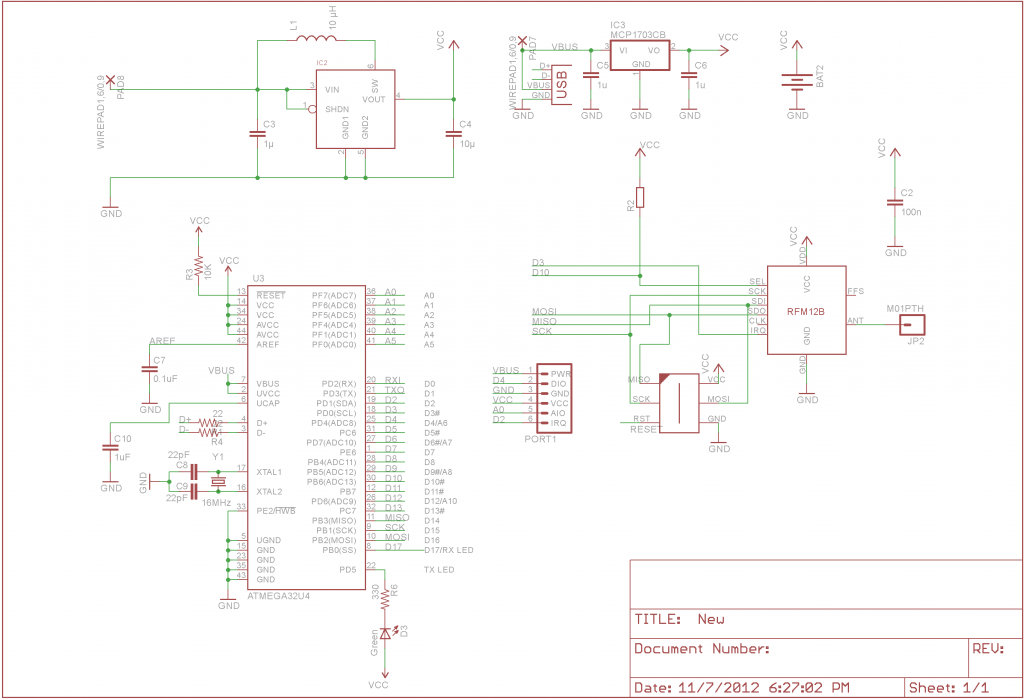
Happy Holidays 🙂
Looks great! Don’t have experience in developing PCB’s, so can’t tell if it’s a good layout. I like the USB connectivity, easier to program and theoretically we could attach a small USB stick to store data on :-). Why did you choose for QFN instead of TQFP. Soldering TQFP is do-able to me, but QFN is a lil’ to hard. Think you need a hot air soldering station then?
Anyway, sign me up for these “muscled” Funky’s :-)!!
I started with TQFP, but it is too big to fit the board; I now have a hot air soldering station and solder paste, probably it will take few tries to get it right..
Love the project. Have gone back and followed your experiences with the tiny and the funky. It has prompted me to take up Ave programing…..both with 84’s and 85’s. Both DIP and SOIC. I have ordered some parts and hope to build a “super funky” soon. Having an odd problem with the Arduino IDE though in that it will compile code with Watchdog timers fine for the 85, but not for the 84. Oh well, making progress and looking forward to this build.
Thank you for documenting your work and sharing
Dan
Thanks Dan,
please post here if you get this working before me 🙂
I will let you know if I do or find out anything, but I likely will not be tackling this one, at least for some time. I am just getting set up to try some boards for the funky…that should be a steep enough learning curve for now.
Thanks again
Dan
Hate to be a bother but could you check your latest Funky Eagle Files ? Either I am doing something wrong ( most porbable) or there is something missing,
The Files I have Downloaded will not produce a board that looks anything like the ones you picture, I seem to only have actual tracks ( traces) . there are no soild un etched area’s ( at least that I can find a layer for ) anywhere… either that or I am comepletely misreading Eagle. I am kind of anxious to try my hand at etching a board this fine at home and would apreciate a nudge in the right direction.
Thanks
Dan
It looks like you didn’t apply the ‘ratsnet’, that is off when you open the file initially. Please give it a try
Figured out the problem with the watchdog timers…. there were no defines and the 85 and 84’s use differant nomeclature for Watchdog functions
Perfect!
I knew it had to be something I was doing wrong.
looks great now.
I’m eager to hear how the QFN soldering goes. I hand solder my boards but haven’t gone smaller than 0.5mm pitch QFPs or 0603 components. I’d kind of like to try 0402s just to see if I can, and QFNs as that would open up a range of possibilities. As for the layout, looks like it all fits 🙂 I don’t have any professional experience or knowledge of RF emissions optimization or any of that. I suspect you could probably reduce the # of vias and bottom layer traces, at first glance, but that’s just a guess. I really enjoy routing PCBs by hand. It’s like a fun puzzle 😀 Anyway the board looks really cool. Glad I found this blog. Take care. –Michael
I just completed the etching of my First Funky Board, used an old HP 4001 and toner transfer, then did the “Cupric chloride etch. I just need to drill it and jump the VIAS but it looks like I have a useable board. thanks for posting everything and for helping get them printed out ( this is the super funky 84 board) I’ll let you know when I get something working
Thanks again
I’d be truly surprised if that works, but in any case please post some pictures, it would be lovely to see
Honestly, I will be suprised as well, but so far it is looking good.
Pingback: Funky v2 (well almost) | Martin's corner on the web