
I created a Node-RED RFM2Pi gateway few weeks ago, have it running nicely since then. I decided to use that approach instead of a python script, since it is very flexible, visual and easy to extend. Prior to Node-RED I used the great OEM gateway script by Jérôme Lafréchoux. My inspiration to switch to Node-RED were Nathan Chantrell’s posts and tweets and Don Bramey’s work.
Getting Node-RED installed on Raspberry Pi is best described on Adafruit’s site [Edit: see Ukmoose’ comment below on node.js version]. Should be straightforward for most. In addition, I installed MQTT:
sudo apt-get install mosquittoThe idea of the gateway is to
- Interface with the RFM2Pi board
- Forward all incoming wireless packets to EmonCMS for logging and further analysis
- Send current time to wireless nodes like EmonGLCD
Here are the Node-RED flows
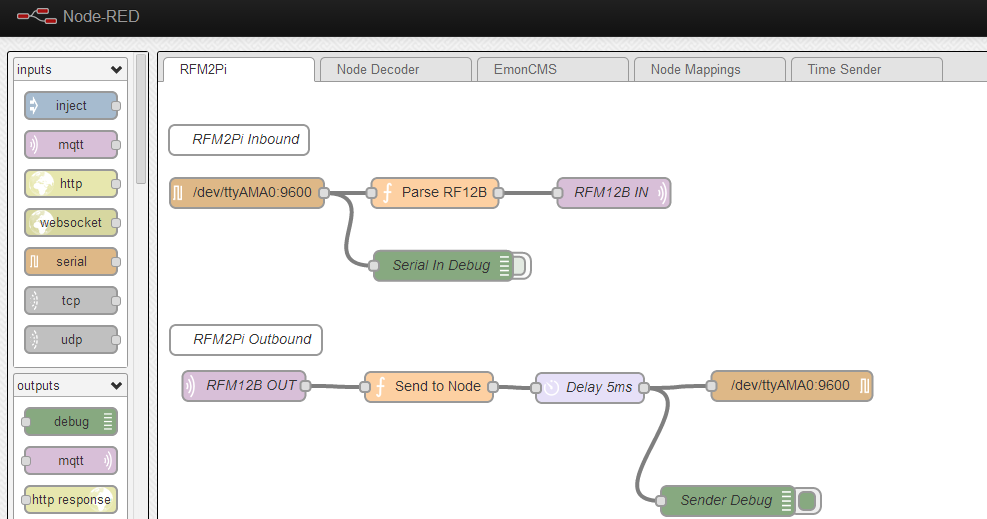
The RFM2Pi flow containing the inbound and outbound functions
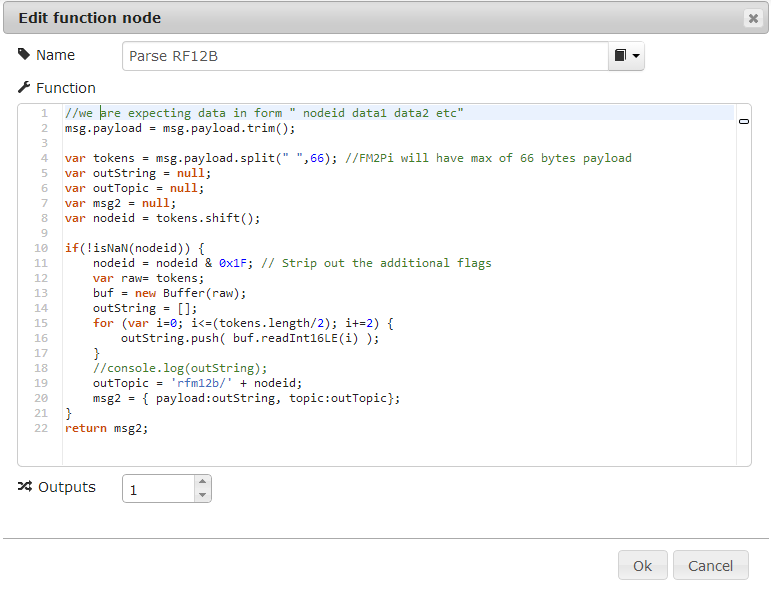
This uses the so called ‘multinode’ approach, i.e. doesn’t really decode or understand what is being sent. It just captures the payload and publishes it to a MQTT topic
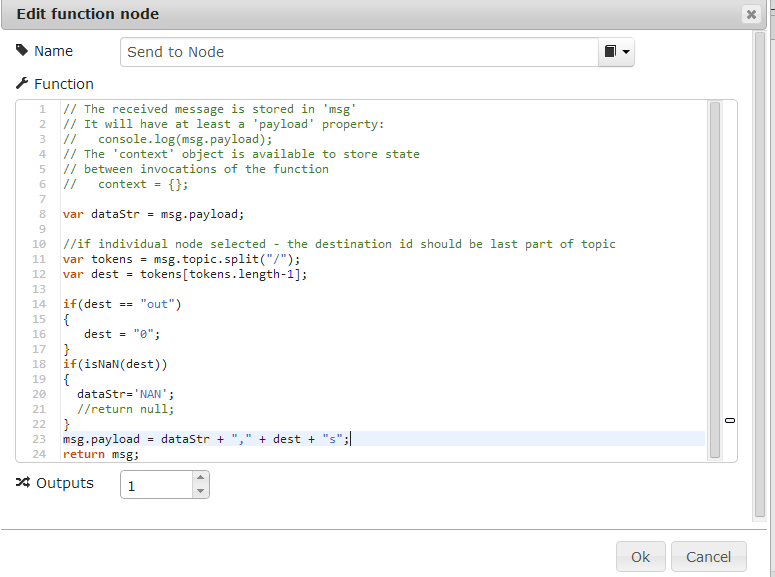
The RFM2Pi sender function
And here is the source code for this flow:
[{"id":"b7108ab7.48ef78","type":"serial-port","serialport":"/dev/ttyAMA0","serialbaud":"9600","newline":"\\r\\n","addchar":"true"},{"id":"ba386057.845d3","type":"mqtt-broker","broker":"localhost","port":"1883"},{"id":"4daa1376.b255ec","type":"function","name":"Parse RF12B ","func":"//we are expecting data in form \" nodeid data1 data2 etc\"\nmsg.payload = msg.payload.trim();\n\nvar tokens = msg.payload.split(\" \",66); //FM2Pi will have max of 66 bytes payload\nvar outString = null;\nvar outTopic = null;\nvar msg2 = null;\nvar nodeid = tokens.shift();\n\nif(!isNaN(nodeid)) {\n\tnodeid = nodeid & 0x1F; // Strip out the additional flags\n\tvar raw= tokens;\n\tbuf = new Buffer(raw);\n\toutString = [];\n\tfor (var i=0; i<=(tokens.length/2); i+=2) {\n\t\toutString.push( buf.readInt16LE(i) );\n\t}\t\n\t//console.log(outString);\n\toutTopic = 'rfm12b/' + nodeid;\n\tmsg2 = { payload:outString, topic:outTopic};\n}\nreturn msg2;","outputs":"1","x":277,"y":111,"z":"437a6787.bc8598","wires":[["d02f9e7.f2fd06"]]},{"id":"d02f9e7.f2fd06","type":"mqtt out","name":"RFM12B IN","topic":"","broker":"ba386057.845d3","x":456,"y":111,"z":"437a6787.bc8598","wires":[]},{"id":"2a97ab9.fd56854","type":"serial in","name":"","serial":"b7108ab7.48ef78","x":89,"y":111,"z":"437a6787.bc8598","wires":[["4daa1376.b255ec","512b148f.aed4ec"]]},{"id":"1af69d77.e50963","type":"mqtt in","name":"RFM12B OUT","topic":"rfm12b/out","broker":"ba386057.845d3","x":86,"y":304,"z":"437a6787.bc8598","wires":[["80d0c97c.7f2f38"]]},{"id":"80d0c97c.7f2f38","type":"function","name":"Send to Node","func":"// The received message is stored in 'msg'\n// It will have at least a 'payload' property:\n// console.log(msg.payload);\n// The 'context' object is available to store state\n// between invocations of the function\n// context = {};\n\nvar dataStr = msg.payload;\n\n//if individual node selected - the destination id should be last part of topic\nvar tokens = msg.topic.split(\"/\");\nvar dest = tokens[tokens.length-1];\n\nif(dest == \"out\")\n{\n dest = \"0\";\n}\nif(isNaN(dest))\n{\n dataStr='NAN';\n //return null;\n}\nmsg.payload = dataStr + \",\" + dest + \"s\";\nreturn msg;","outputs":1,"x":271,"y":305,"z":"437a6787.bc8598","wires":[["906cd828.6f9328"]]},{"id":"512b148f.aed4ec","type":"debug","name":"Serial In Debug","active":false,"complete":"false","x":285.42852783203125,"y":183.85711669921875,"z":"437a6787.bc8598","wires":[]},{"id":"ff2da801.00d258","type":"comment","name":"RFM2Pi Inbound ","info":"","x":81,"y":58,"z":"437a6787.bc8598","wires":[]},{"id":"6bb839bd.9447c8","type":"comment","name":"RFM2Pi Outbound","info":"","x":88,"y":258,"z":"437a6787.bc8598","wires":[]},{"id":"67bfcebf.98403","type":"serial out","name":"","serial":"b7108ab7.48ef78","x":634,"y":304,"z":"437a6787.bc8598","wires":[]},{"id":"113cd655.eec32a","type":"debug","name":"Sender Debug","active":true,"complete":"false","x":570,"y":419,"z":"437a6787.bc8598","wires":[]},{"id":"906cd828.6f9328","type":"delay","name":"Delay 5ms","pauseType":"delay","timeout":"5","timeoutUnits":"milliseconds","rate":"1","rateUnits":"second","randomFirst":"1","randomLast":"5","randomUnits":"seconds","x":432,"y":306,"z":"437a6787.bc8598","wires":[["67bfcebf.98403","113cd655.eec32a"]]}]
Next is the EmonCMS interface flow:
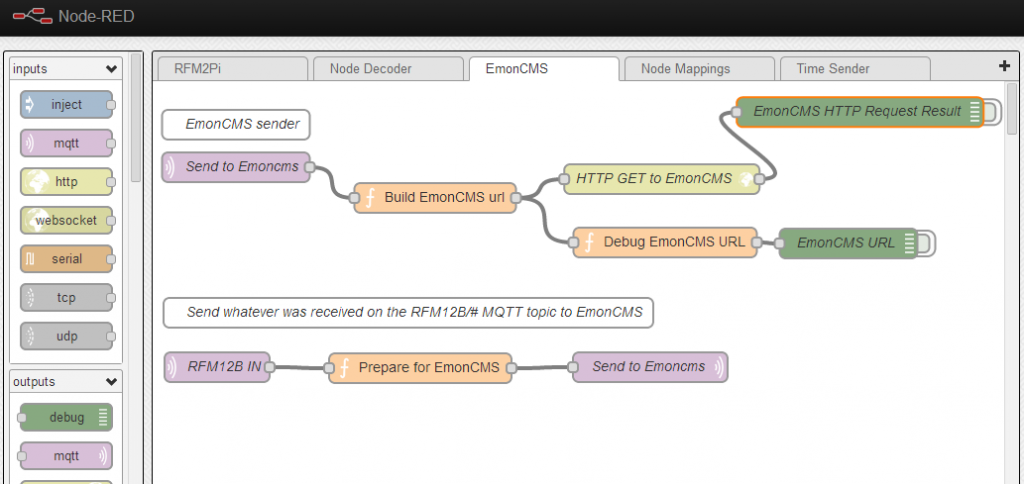
Most interesting is the “Prepare for EmonCMS” function:
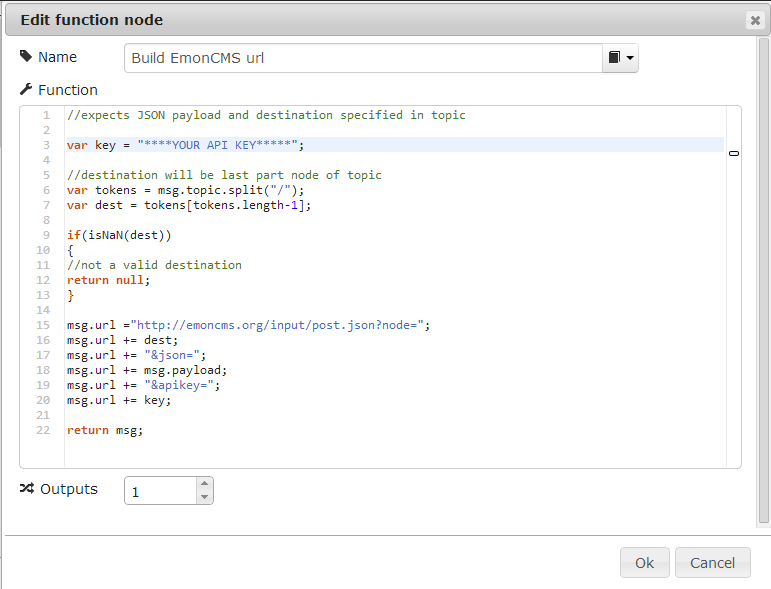
Mind to place your API key here, emoncms URL as well, if it is not default
And the source code for this flow is:
[{"id":"ba386057.845d3","type":"mqtt-broker","broker":"localhost","port":"1883"},{"id":"909bcfcf.6f643","type":"mqtt in","name":"Send to Emoncms","topic":"home/emoncms/out/#","broker":"ba386057.845d3","x":84.00000762939453,"y":87,"z":"fea0be35.015f4","wires":[["8ebc9733.714368"]]},{"id":"8ebc9733.714368","type":"function","name":"Build EmonCMS url","func":"// The received message is stored in 'msg'\n// It will have at least a 'payload' property:\n// console.log(msg.payload);\n// The 'context' object is available to store state\n// between invocations of the function\n// context = {};\n\n//expects JSON payload and destination specified in topic\n\nvar key = \"**** YOUR API *****\";\n\n//destination will be last part node of topic\nvar tokens = msg.topic.split(\"/\");\nvar dest = tokens[tokens.length-1];\n\n\nif(isNaN(dest))\n{\n//not a valid destination\nreturn null;\n}\n\nmsg.url =\"http://emoncms.org/input/post.json?node=\";\nmsg.url += dest;\nmsg.url += \"&json=\";\nmsg.url += msg.payload;\nmsg.url += \"&apikey=\";\nmsg.url += key;\n\n\nreturn msg;","outputs":1,"x":285.00001525878906,"y":119,"z":"fea0be35.015f4","wires":[["f9933cd6.066cc","bef8a264.41076"]]},{"id":"f9933cd6.066cc","type":"http request","name":"HTTP GET to EmonCMS","method":"GET","url":"","x":513.6667175292969,"y":99,"z":"fea0be35.015f4","wires":[["87f944f6.7806b8"]]},{"id":"87f944f6.7806b8","type":"debug","name":"EmonCMS HTTP Request Result","active":false,"complete":"false","x":713.6666870117188,"y":31.333343505859375,"z":"fea0be35.015f4","wires":[]},{"id":"a8c85fa8.5737a","type":"debug","name":"EmonCMS URL","active":false,"complete":"true","x":702,"y":164,"z":"fea0be35.015f4","wires":[]},{"id":"bef8a264.41076","type":"function","name":"Debug EmonCMS URL","func":"// The received message is stored in 'msg'\n// It will have at least a 'payload' property:\n// console.log(msg.payload);\n// The 'context' object is available to store state\n// between invocations of the function\n// context = {};\n\n\nreturn msg.url;","outputs":1,"x":517,"y":163,"z":"fea0be35.015f4","wires":[["a8c85fa8.5737a"]]},{"id":"788069a.f877f98","type":"mqtt in","name":"RFM12B IN","topic":"rfm12b/#","broker":"ba386057.845d3","x":65,"y":289,"z":"fea0be35.015f4","wires":[["ca153b2d.35eac8"]]},{"id":"314a8d67.ceb572","type":"mqtt out","name":"Send to Emoncms","topic":"","broker":"ba386057.845d3","x":502,"y":289,"z":"fea0be35.015f4","wires":[]},{"id":"ca153b2d.35eac8","type":"function","name":"Prepare for EmonCMS","func":"// The received message is stored in 'msg'\n// It will have at least a 'payload' property:\n// console.log(msg.payload);\n// The 'context' object is available to store state\n// between invocations of the function\n// context = {};\n\n//destination will be last part node of topic\nvar tokens = msg.topic.split(\"/\");\nvar dest = tokens[tokens.length-1];\n\nmsg.topic = \"home/emoncms/out/\";\nmsg.topic += dest;\n\nreturn msg;\n","outputs":1,"x":270,"y":290,"z":"fea0be35.015f4","wires":[["314a8d67.ceb572"]]},{"id":"b8e15d04.471ea","type":"comment","name":"EmonCMS sender","info":"","x":84,"y":44,"z":"fea0be35.015f4","wires":[]},{"id":"7a28503a.85d7b","type":"comment","name":"Send whatever was received on the RFM12B/# MQTT topic to EmonCMS","info":"","x":258,"y":234,"z":"fea0be35.015f4","wires":[]}]
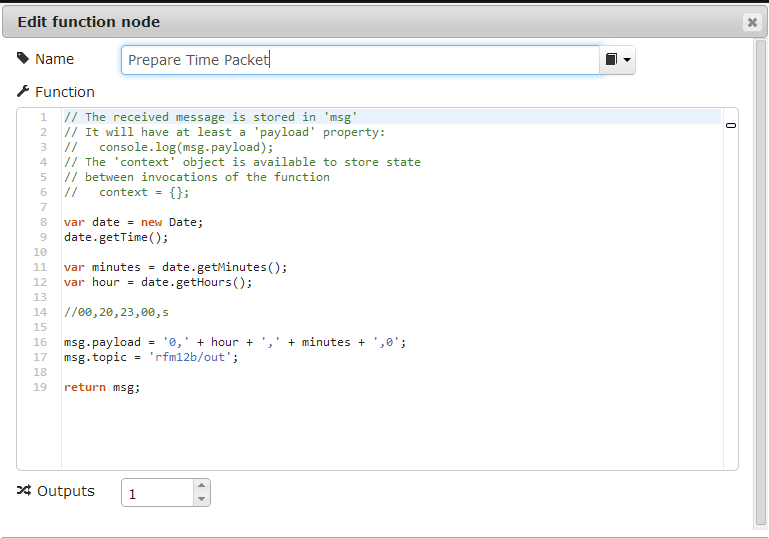
The final component is the time sender flow:
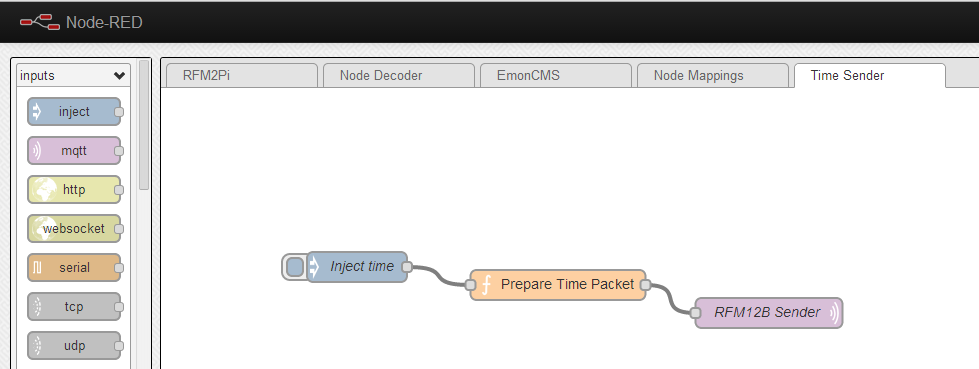
I have an inject node that kicks in every minute, you can reduce that to whatever is necessary. Most of the work is done in the “Prepare Time Packet” function:
And the source code is:
[{"id":"ba386057.845d3","type":"mqtt-broker","broker":"localhost","port":"1883"},{"id":"df2824d5.20d7d8","type":"inject","name":"Inject time","topic":"","payload":"","repeat":"","crontab":"*/1 * * * *","once":true,"x":196,"y":179,"z":"7733bcb0.88cc44","wires":[["431cf1b3.bce31"]]},{"id":"431cf1b3.bce31","type":"function","name":"Prepare Time Packet","func":"// The received message is stored in 'msg'\n// It will have at least a 'payload' property:\n// console.log(msg.payload);\n// The 'context' object is available to store state\n// between invocations of the function\n// context = {};\n\nvar date = new Date;\ndate.getTime();\n\nvar minutes = date.getMinutes();\nvar hour = date.getHours();\n\n//00,20,23,00,s\n\nmsg.payload = '0,' + hour + ',' + minutes + ',0';\nmsg.topic = 'rfm12b/out';\n\nreturn msg;","outputs":1,"x":397,"y":197,"z":"7733bcb0.88cc44","wires":[["36026f66.c9fd9"]]},{"id":"36026f66.c9fd9","type":"mqtt out","name":"RFM12B Sender","topic":"","broker":"ba386057.845d3","x":608,"y":225,"z":"7733bcb0.88cc44","wires":[]}]
As conclusion, I believe Node-RED is the future of IoT wiring. Do get started with it.
Martin,
Good write up, I’ve also migrated to NodeRED and can see it becoming the place to do a lot of the input to feed calculations on emoncms.
The Adafruit instructions suggest using a newer version of node.js than node-red recommends for the Raspberry Pi. Have you seen any memory leakages leading to freezing?
I actually used the NodeRED recommended version, posted the Adafruit link to make it easier for folks to do the installation. I didn’t really notice that Adafruit recommends using newer node.js, this may cause troubles. Will edit the link now to point to your comment.
I really need to update the adafruit tutorial but I first want to check that the latest version of node.js still contains the memory leaks as there was an update released on Tuesday, which might mean that the tutorial is now OK.
I’ll do some testing over the weekend and amend the adafruit instructions if necessary. Also if you have found any other issues with the instructions let me know and I will add them in too.
The RFM12b Pi v2 price could that be lower then 22 Euro?
Thanks
It could be as low as you can go if you DIY. Here is how the RFM2Pi project started: http://harizanov.com/2012/07/rfm12b-to-serial-pcb-for-my-pi/
DIY cost: $10
I also picked up another tip from Nathan’s latest blog post: http://nathan.chantrell.net/20140208/tinytx-tiny328-sensors-with-node-red/
Which was the “warn if error” on Emoncms posting. By passing the response from the http GET node onto another node and then doing a simple if the websites response isn’t “ok”. Send me a message.
Can you suppress these for a while after initial kick in? I see lots of messages being sent on relatively short service outage
So I’ve had it setup for a couple of days and haven’t seen one yet!
How short is short?
There is a rate limit node (part of the delay node) so you could limit the number of messages to a number per minute/hour/day.
Or it would be fairly easy to take Nathan’s function and only send an Email if it has errored for X number of loops.
using context.XXXX (to hold data between function calls).
Good comments, will have to follow up
Hi.
I’ve been unable to get any of the additional modules to load, specifically the serial module needed to implement your flow. I’m using the recommended version of node.js as mentioned above but cannot get any of the additional modules to show up in the palette. Any idea of what I have missed or am doing wrong?
Terry
Have you tried this: http://learn.adafruit.com/raspberry-pi-hosting-node-red/installing-further-plugins
specifically
cd ~/node-red/
sudo npm install serialport
Thanks for the quick reply. This has been driving me crazy for the last couple of days after I first came across Node Red. I’m running the latest Raspian on a version 1 Pi to prove that I can get Node Red loaded and running. I’ve followed the instructions on the Node Red site to get the 0.8.22 release of node.js and then the Adafruit instructions to load the latest Node Red including the stop/start script and adding further modules. I’ve tried adding the badwords module following the instructions. This produces the response shown in the tutorial and it has a folder in the node_modules directory but it does not show in the palette even when I have rebooted the Pi. I followed your directions on how to add the serial module and got the following output:
pi@raspberrypi ~/node-red $ sudo npm install serialport
npm http GET https://registry.npmjs.org/serialport
npm http 304 https://registry.npmjs.org/serialport
npm http GET https://registry.npmjs.org/bindings/1.1.1
npm http GET https://registry.npmjs.org/async/0.1.18
npm http GET https://registry.npmjs.org/sf/0.1.6
npm http GET https://registry.npmjs.org/optimist
npm http GET https://registry.npmjs.org/nan
npm http 304 https://registry.npmjs.org/async/0.1.18
npm http 304 https://registry.npmjs.org/optimist
npm http 304 https://registry.npmjs.org/nan
npm http 304 https://registry.npmjs.org/sf/0.1.6
npm http 304 https://registry.npmjs.org/bindings/1.1.1
npm http GET https://registry.npmjs.org/wordwrap
npm http 304 https://registry.npmjs.org/wordwrap
> serialport@1.3.1 install /home/pi/node-red/node_modules/serialport
> node-gyp rebuild
gyp WARN EACCES user “root” does not have permission to access the dev dir “/root/.node-gyp/0.8.22”
gyp WARN EACCES attempting to reinstall using temporary dev dir “/home/pi/node-red/node_modules/serialport/.node-gyp”
gyp http GET http://nodejs.org/dist/v0.8.22/node-v0.8.22.tar.gz
gyp http 200 http://nodejs.org/dist/v0.8.22/node-v0.8.22.tar.gz
make: Entering directory `/home/pi/node-red/node_modules/serialport/build’
CXX(target) Release/obj.target/serialport/src/serialport.o
CXX(target) Release/obj.target/serialport/src/serialport_unix.o
CXX(target) Release/obj.target/serialport/src/serialport_poller.o
SOLINK_MODULE(target) Release/obj.target/serialport.node
SOLINK_MODULE(target) Release/obj.target/serialport.node: Finished
COPY Release/serialport.node
make: Leaving directory `/home/pi/node-red/node_modules/serialport/build’
npm WARN unmet dependency /home/pi/node-red/node_modules/simple-xmpp/node_modules/node-xmpp/node_modules/node-xmpp-client requires request@’~2.27.0′ but will load
npm WARN unmet dependency /home/pi/node-red/node_modules/simple-xmpp/node_modules/node-xmpp/node_modules/request,
npm WARN unmet dependency which is version 2.34.0
npm WARN unmet dependency /home/pi/node-red/node_modules/simple-xmpp/node_modules/node-xmpp/node_modules/node-xmpp-client requires ltx@’~0.3.2′ but will load
npm WARN unmet dependency /home/pi/node-red/node_modules/simple-xmpp/node_modules/node-xmpp/node_modules/ltx,
npm WARN unmet dependency which is version 0.4.0
npm WARN unmet dependency /home/pi/node-red/node_modules/simple-xmpp/node_modules/node-xmpp/node_modules/node-xmpp-client requires node-xmpp-core@’~0.3.1′ but will load
npm WARN unmet dependency /home/pi/node-red/node_modules/simple-xmpp/node_modules/node-xmpp/node_modules/node-xmpp-core,
npm WARN unmet dependency which is version 0.2.3
serialport@1.3.1 node_modules/serialport
âââ bindings@1.1.1
âââ sf@0.1.6
âââ async@0.1.18
âââ nan@0.7.1
âââ optimist@0.3.7 (wordwrap@0.0.2)
pi@raspberrypi ~/node-red $
You can see by the 304 responses that I have already tried to add the serial module. I can only think I am doing something wrong. I must be on the third or fourth clean install trying to get this to work. I keep ending up with an installation that appears to work as I can create flows but I can’t seem to add any of the additional modules that will let me do the fun things.
Terry
The output you posted suggests lack of root access, try prefixing the commands with ‘sudo’
Pingback: Presence detection using phone’s WiFi and Node-RED | Martin's corner on the web
Hi
I think I may have found the problem. I’m running Windows 7 with Internet Explorer 11. I thought I would try Chrome as the browser and all the additional modules are showing in the palette. I’ve tried refreshing Internet Explorer but they still don’t appear so I guess I’ll be using Chrome. I’ll confirm that everything is working once I’ve had a chance to check it out.
Terty
Hi Martin,
Thanks for sharing!
I found a minor error in your parser: (tokens.length/2); should be replaced by (tokens.length-2);
Hi,
it is not an error, but I can see how confusing that could be. Basically we have a structure that is “byte word word word…”, and data is provided in bytes (one word = 2 bytes). I hope this makes sense, if not – just leave as is 🙂
Hi Martin,
With “/2” the parser will only read the first two values in my case. My DHT22-sensor inputs “ID/BATT/TEMP/HUM” which the parser outputs as “ID/BATT/TEMP”.
I was having this problem as well. The last value on my emonth was being cut out. and on my 7 output node I was only getting four of the outputs to work. A friend and I worked out a solution. If someone tries this, please let me know if this works on the current monitoring nodes like the emontx as I currently do not have one of those boards.
code below:
//we are expecting data in form ” nodeid data1 data2 etc”
msg.payload = msg.payload.trim();
var tokens = msg.payload.split(” “,66); //FM2Pi will have max of 66 bytes payload
var outString = null;
var outTopic = null;
var msg2 = null;
var nodeid = tokens.shift();
if(!isNaN(nodeid)) {
nodeid = nodeid & 0x1F; // Strip out the additional flags
outString = [];
for (var i=0; i<tokens.length; i+=2) {
outString.push(parseInt(tokens[i]) + (256 * tokens[i+1]));
}
//console.log(outString);
outTopic = 'rfm12b/' + nodeid;
msg2 = { payload:outString, topic:outTopic};
}
return msg2;
It is slightly more inefficient than your code, but that should not be a problem on the raspberry pi. if you need the node red flow I can provide that, but I don't have access to my installation at this moment
Thanks for the fix. It works on my setup, which is basically emonTH nodes that send four variables.
I’m having some trouble getting this to work. this is supposed to replace the rfm2piphp script right? It seems the serial port is not working. I have the serial node installed and got no errors when importing the flows and the sender debug displays 0,4,47,0,0s on rfm12b/out, but nothing is received and the led on the rfm2pi board does not blink. (I set a node to broadcast every 2 seconds or so, so that is not a problem) I did not stop the rfm2piphp service. Could it be hogging the serial port? – stopping it once I can ssh in does nothing, how do i disable it on start? I am running the HD based local version of emoncms if you need to know.
Nevermind. I found my problem, the rfm2pi did not have the right settings locked in and was receiving the wrong frequency. A reset and manual configuration through minicom fixed this for me. I also disabled the rfm2piphp script with “sudo update-rc.d rfm2piphp remove”
Anyone tried the Emoncms node with NodeRed? https://github.com/node-red/node-red-nodes/tree/master/io/emoncms
Actually I did, works as expected.
Pingback: Interfacing with Paradox home security system attempt 2 | Martin's corner on the web
Excellent site you have here Martin, it’s really helpfull. I have a question for you:
Before you installed Node-red, did you just have a standard Raspbian installation on your Raspberry Pi?
I’m having some issues with the adafruit guide, using a clean install of Raspbian.
Hi, why not use the instructions on node-red’s site? http://nodered.org/docs/hardware/raspberrypi.html
Hi Martin,
It would be nice to add another flow that performs a function similar to emoncms’ packetgen. That way we could send packets to update an emonGLCD or output to control some other device. Just an idea.
Tom